
Full Bitcoin node on a Raspberry Pi 3 with or without a PiDrive
- Overview - Table of Contents
- THE HARDWARE REQUIREMENTS
- INITIAL SETUP
- UPDATING AND CONFIGURING THE SYSTEM
- GETTING THE PIDRIVE READY
- ADDING A SWAPFILE
- ALLOWING SSH ACCESS FROM
- LETTING BITCOIN CORE START
- OPEN PORT IN YOUR ROUTER
- START YOUR NEW FULL NODE
- DOWNLOAD AND USE MY ALMOST
- THANKS
For a long time the Raspberry Pi has seemed tempting for people who wanted to run a full node on the Bitcoin network because of its small size, low power use and cheap price-tag. With their relatively low performance specs, the first generations of the Pi were really not quite up to the task, though. Some people were able to compile and run Bitcoin Core (this very blog, for instance), but only barely, and others didn't succeed in making it work at all.
This has changed to the better with the newer generations of the Pi. The Raspberry Pi 2 and especially the Raspberry Pi 3 have more RAM and multi-core processors. While we're still far from modern desktop computers, of course, you're much better off with the current specs than before. That being said, syncing the blockchain can still be quite painful on a Pi 3.
With the blockchain growing larger and larger, you basically have two options. One option is to have enough storage space to contain the entire blockchain (and then some), be it by means of a really large Micro SD card, a Western Digital PiDrive like explained here, or a large USB pen-drive. The other option is pruning the blockchain, which became available in the Bitcoin Core software recently. Pruning is basically storing only the most recent part of the blockchain, and cutting away everything else.
Also, for Ubuntu, pre-compiled binaries of Bitcoin Core and its dependencies have been made available for the Raspberry Pi, which has made the process much easier since you no longer have to compile yourself if you don't wish to go through the trouble.
This guide will show how to set up a complete headless full node system with a Pi 3, either as a pruned node, or using a Western Digital PiDrive (or another USB harddisk) to store the blockchain. A Raspberry Pi 3 with a connected PiDrive will consume around 3-4 watt of power. A pruned node on just the Pi 3 is just above 2 watt. Compare that to the 100-200 watt that is consumed by a typical desktop computer running Bitcoin software with the screen turned off.
It will be a bit technical, but my goal was to make it quite comprehensive and explaining, so even if you have little to no experience with using Linux/Unix systems, you should be able to follow along, as long as you're not afraid of trying out new things.
THE HARDWARE REQUIREMENTS
Raspberry Pi 3: This guide will be using the Raspberry Pi 3 model B, but the process should be the same on the Pi 2, if you have that laying around. If you're going to buy a new Pi for this project, I recommend going for the Pi 3, since its price-tag is the same, and the specs are higher.
Micro SD card, min 4-8 GB (min 16 GB without PiDrive), class 10 or better: The Pi boots off an SD card. For that you'll need one that's fairly fast, so get a class 10 or better. 4 or 8 GB should be more than enough for setups with the PiDrive. This one is fine, but be aware that PiDrives often come with a 4 GB MicroSD card included, so you may not have to buy one separately.
If you're planning on a pruned node without a harddisk, choose a fairly larger SD card, depending on how much of the blockchain you want to prune (also take into account the space taken up by the system plus a swapfile). 16 GB is probably the minimum without a PiDrive. Warning: Don't buy cheap SD cards off Ebay and elsewhere from China, as these are often small cards technically disguised as larger cards.
SD card reader: You'll need an SD card reader and a MicroSD card adapter or some other way to plug your Micro SD card into your ordinary computer during installation of the Pi's operating system.
WD PiDrive (optional if you're going to run a pruned node): Since SD cards of the required size to store the entire blockchain are quite expensive still, we will be using a harddisk to store the space hungry blockchain files. Western Digital's PiDrive is very fit for the purpose; it comes in sizes of 250 GB, 314 GB and even 1 TB.
In the spirit of Pi, I used the 314 GB version (π ≈ 3.14, get it?), a storage capacity that at the time of writing can hold the blockchain three times, so there's plenty of space left for the rapid growth the blockchain. At the same time, it comes with a USB plug that fits right into one of the Pi's USB slots, instead of a SATA connector as usual, and a nice lead that allows you to power both the Pi and the PiDrive from the same power supply.
Alternatively, you could use an external USB-harddisk of any make and model, or an internal harddisk with a powered USB adapter. Also, if you want to save on power, an SSD or a USB pendrive instead of a physical harddrive will be a good option. And of course, if you plan on running a pruned node or on getting a huge MicroSD card, you won't need an extra drive at all.
Micro USB power adapter, min 2.5 A: As the Pi models grow bigger in specs, so do their power requirements. Traditionally, Pi owners have used old phone chargers as a power supply. While you can still do that, you should be very cautious that the supply delivers enough power for the newer Pi models. A minimum of 2.5 A is the official recommendation. The easy route (and the safe bet) is to just get the official Pi 3 power supply which can power both the Pi 3 and the PiDrive at the same time.
Ethernet cable (optional): Even though the Pi 3 has built-in wifi support, I recommend using a cabled network for a Bitcoin node. For that you'll need a piece of Ethernet cable from your network router/switch to your Pi. The Raspberry Pi supports only 10/100 Mbit/s, so any category 5e or better is fine. If you must, you can of course use wifi instead, but in my experience, cabled network is just much more reliable.
Raspberry Pi case (optional): In order not to risk damaging the electronics parts of your Pi, I recommend to get a case for it. This might be anything from one of the many different cases that are available, or you might make a case yourself that fits both the Pi and your PiDrive.
Heatsink and/or fan for the Pi (optional): Either an inactive aluminium heatsink, a cooling fan (comes with some cases), or maybe both. The Raspberry Pi Foundation says cooling is not necessary on a Pi, and the Pi does throttle down performance when it gets too hot to prevent damage. However, especially when syncing with the blockchain, the Pi's CPU runs quite hot to a degree that I can't hold my finger on it for more than a couple of seconds.
Also, I see the "thermometer" symbol on the screen (meaning performance is being throttled) quite often. After adding a heatsink and a fan I haven't noticed performance being throttled. It should be noted that after synchronisation is done, load on the CPU decreases drastically, and you will probably have no problems running without cooling day-to-day.
A spare HDMI screen, USB keyboard and mouse: These will only be used during setup, so don't go out buying these.
Several of these hardware items are available from online store Pi Supply. I am not affiliated with them in any way, other than I'm a happy customer there; they send worldwide, they have great customer service, and they take Bitcoin.
INITIAL SETUP
For this project, I have chosen to let the Pi run Ubuntu Linux instead of the otherwise very nice Raspbian, since that makes the installation of Bitcoin Core a bit easier.
Installing Ubuntu on the SD card is not too hard. It's a matter of downloading an image file, and writing that image file onto the MicroSD card that the Pi will boot off. Download the latest LTS (long term support) image file. The link here is actually Ubuntu Mate, which is normal Ubuntu with the Mate graphical desktop system, but since we won't be using the desktop system with the finished headless Bitcoin node, it doesn't really matter which flavour of Ubuntu it is. I also tried with the unofficial Ubuntu Server image without a desktop system, but I had boot problems after updating it, so I went for Ubuntu Mate instead.
After downloading the image file, it needs to be written to the MicroSD card. How this is done differs depending on whether you're on Windows, Linux, Mac, etc., but the Raspberry Pi Foundation has a very nice guide to doing that.
After writing the image file to the MicroSD card, insert it into the Pi, and also connect the PiDrive (unless you're going for the pruned node), Ethernet cable, keyboard, mouse, and screen.
UPDATING AND CONFIGURING THE SYSTEM
Plug in the power cable, and the Pi will boot up and you will be presented with a few dialogue boxes where you should set up your time zone, user account and password for the system and a few other things. The remainder of this guide will assume user name pinode, but you can of course use which ever user name you wish. You are encouraged to use a strong password, especially if you plan to be able to log in from the Internet. Once completed, you will be able to login to the Mate desktop.
Start up a Terminal (sort of a command line window; opened through the Applications menu, System Tools, MATE Terminal), and give the following command to let the Pi boot up into text mode in the future, since there is no need for a headless Bitcoin node to spend precious RAM on loading a full graphical desktop:
sudo systemctl set-default multi-user.target
Now, reboot the Raspberry Pi and make sure that you are logged in to the text based command line interface (all black screen with white text).
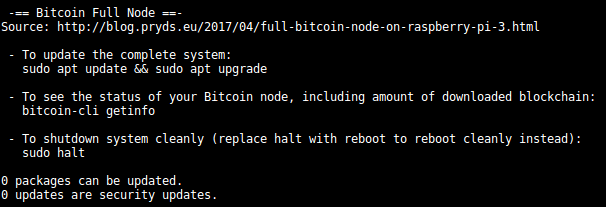
The next six commands will: 1: Tell the system from where it should fetch the Bitcoin software. 2: Update the system's information about which packages are available to download and install. 3: Download and install the text based version of Bitcoin Core, plus another tool that will be used next. 4+5: Remove the entire graphical desktop environment so that it doesn't take up space on the SD card.
Run the last of these two remove commands repeatedly (maybe 4-5 times) until it doesn't remove any more packages. 6: Download and install all available updates to the entire system. Type them in one command at a time, as each command will ask you a question or two (typically just press Enter or Y to proceed). The last command will probably take quite some time to finish.
sudo add-apt-repository ppa:bitcoin/bitcoin
sudo apt update
sudo apt install bitcoind deborphan
sudo apt remove --auto-remove --purge libx11-.*
sudo apt remove --purge $(deborphan) #Repeat until no more is removed
sudo apt upgrade
After that we will write a very short and simple configuration text file for Bitcoin Core. We will use the text based editor "nano" since it's very simple to use. Feel free to use any other text editor if you have another favourite, just as long as it writes plain txt files. These two commands create a .bitcoin directory (which is where Bitcoin Core will later put all the blockchain files) in your home directory, and then start up nano and open a new file for editing:
mkdir ~/.bitcoin
nano ~/.bitcoin/bitcoin.conf
In the nano editor, write the four following lines. Omit the last line (prune) if you are connecting the PiDrive and want to keep the full blockchain. Otherwise change 1000 into however many megabytes of the blockchain that your want to store at all times (at least 550). Keep in mind, though, that this number only controls the space that the block files themselves (the ~/.bitcoin/blocks directory) take up.
Other than those, expect a couple of gigabytes or more for other data in ~/.bitcoin. Also keep thought of the space that the Ubuntu system itself takes up. And finally you will most likely be creating a swapfile that will take up around 2-3 GB. See how much free space you have on the partition that will keep the blockchain with the command "df -h ~./bitcoin" and then subtract at least 5-8 GB from that. The following should work on a 16 GB SD card.
dbcache=800
maxmempool=50
disablewallet=1
prune=5000
Hit Ctrl-X to exit nano, and then press the Y key and Enter to save the file.
In the Mate flavour of Ubuntu Linux, 64 MB of the shared memory is reserved for the GPU (graphics chip) by default. We can safely lower that to the minimum of 16 MB, thereby gaining 48 MB of additional RAM. Open the file /boot/config.txt:
sudo nano /boot/config.txt
Then scroll down to the bottom of this (rather long) text file and add the following line:
gpu_mem=16
Again, Ctrl-X and then Y + Enter saves and exits.
GETTING THE PIDRIVE READY
The PiDrive comes preformatted for running on a Linux system on a Pi. Mine contained just one large "ext4" partition which is exactly what is needed.
However, you might also want to use another kind of drive (external USB harddrive, an SSD, a USB pendrive, etc.), and those usually come formatted for Windows, or maybe not formatted at all. So assuming you already connected your drive to the Pi, what we need to do is remove any existing partition(s) and add one large "ext4" partition that fills out the entire drive.
In the end I will of course use my PiDrive, but for the sake of demonstration here, I connected a drive from an old Windows machine that was given to me, through a cheap externally powered SATA to USB adapter (important to get an externally powered one, as the Pi will not be able to deliver enough power for a harddrive). This drive contains several Windows partitions that I needed to remove.
First, to get an overview of the drives that are attached to the Pi, run the following command. Notice that the system also treats the SD card as a drive:
sudo fdisk -l
This gives me the following on my system with the old Windows drive connected:
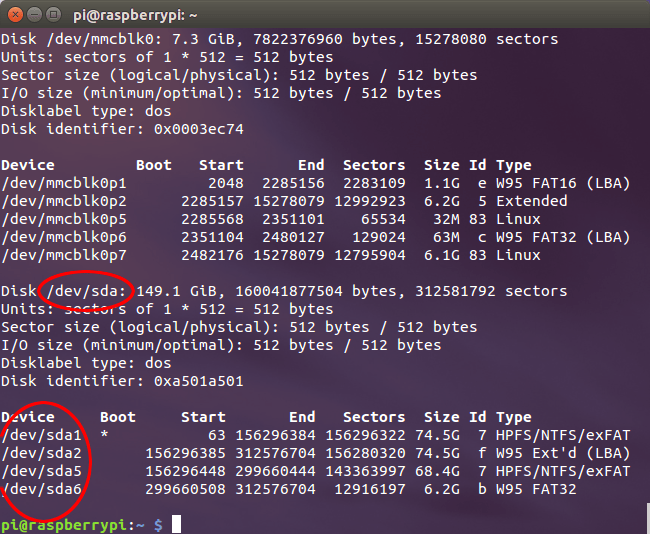
The first disk, named /dev/mmcblk0 is the SD card, so don't do anything to that, or you will lose the Ubuntu system that you just set up. On my system, the next disk is /dev/sda, and you can see that it has four partitions named /dev/sda1, 2, 5 and 6 that need to be removed. Maybe you want to write down the names of the existing partitions on your harddisk, if any.
Notice that ALL DATA that might already be on the harddisk will be lost, so don't use a drive containing anything you don't want to lose. Write the following command to enter the fdisk utility, changing /dev/sda into your harddisk's name if it is different:
sudo fdisk /dev/sda
Here, you will be met with a command prompt. To delete the existing partitions, type d and hit Enter, whereafter the prompt will ask you which partition number to delete, along with a list of the existing partitions numbers. Press a corresponding number and then Enter to delete the partition. Repeat until there are no partitions left.
Now, hit n to create a new partition. Then p to make it a primary partition, and 1 to give it partition number 1 (and hence the partition name /dev/sda1, if your disk name is /dev/sda). At the questions about first and last sector, just press Enter to make the partition fill out the entire harddisk.
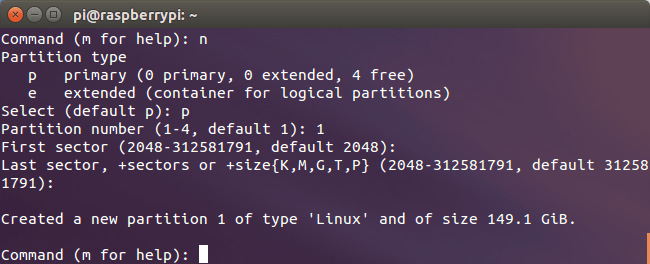
Last, press w + Enter to save the changes to the disk and exit the fdisk tool.
To format your new partition, type in the following command (making sure to change the partition name approately, if your disk was not /dev/sda):
sudo mkfs.ext4 /dev/sda1
After a short while, you are ready to mount the partition. In the Linux world, drives don't mount to drive letters like in Windows. Instead you can mount a drive/partition to any place in the file tree. We will take advantage of this fact by mounting the harddisk partition to the ~/.bitcoin directory, which is exactly the place where Bitcoin Core will save its settings and store the blockchain. This way, the entire system is stored on the SD card (including Bitcoin Core itself), except for Bitcoin Core's data files.
To do this, you must first move the existing directory out of the way and create a new empty directory that the drive partition will be mounted to:
mv ~/.bitcoin ~/.bitcoin-old
mkdir ~/.bitcoin
Now, to tell the system to mount the drive to the newly created directory on every boot, you need to edit a short text file. Again, the text editor nano will come in handy:
sudo nano /etc/fstab
In the bottom of the file, write the following line (remember to change "sda1" if your harddrive partition was named differently, and also change "pinode" into your username):
/dev/sda1 /home/pinode/.bitcoin ext4 defaults 0 0
Then, press Ctrl-x followed by y and Enter to save the file and exit nano.
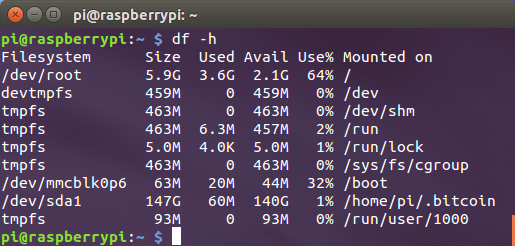
Test it out by typing sudo reboot to reboot the system. When the Pi has rebooted, log in and type df -h to see all mounted partitions. Your newly created harddisk partition should be in the list along with information that it is mounted to your .bitcoin directory:
Finally, make sure that the pinode user account (which will be running Bitcoin Core) has full access to the harddrive, and then move the bitcoin.conf file to the harddrive:
sudo chown pinode /home/pinode/.bitcoin
sudo chgrp pinode /home/pinode/.bitcoin
mv ~/.bitcoin-old/bitcoin.conf ~/.bitcoin/
ADDING A SWAPFILE
Now for an optional, but highly recommended step, namely adding a swapfile. The Pi 3 has 1 GB of RAM, which is an improvement to earlier Pi's, but still quite low for running Bitcoin Core as a full node, especially during synchronisation with the blockchain. A swapfile (or a swap partition) is a part of the harddrive (or in this case, the SD card) that acts as an addition to the RAM.
The Ubuntu Mate system does not use a swapfile or swap partition by default. The reason that the step is optional is that swapfiles (and swap partitions) can be quite hard on an SD card due to the many read/write operations being performed, and SD cards only last for a certain amount of read/write operations.
It's not like it will wear out in a few days or weeks or anything like that; just be prepared to only use your SD card for this project. The reason that adding a swapfile is highly recommended anyway is that chances are you will not be able to synchronise with the blockchain without it, since 1 GB RAM may simply be too little. However, we will set up the system to only use the swapfile if strictly necessary.
If you will be connecting a PiDrive, it is highly recommended to put the swapfile there instead of on the SD card. Just use /home/pinode/.bitcoin/swapfile instead of /swapfile in the rest of the commands in this section.
To set up a swapfile, perform the following commands. 4 GB RAM for a Bitcoin node should be more than fine, so given the Pi's 1 GB RAM, you can set up the swapfile to 3 GB:
sudo fallocate -l 3G /swapfile
sudo chmod 600 /swapfile
sudo mkswap /swapfile
sudo swapon /swapfile
sudo nano /etc/fstab
The last command will open the settings file for partitions to be mounted at boot. Scroll down to the end and add the following line, then Ctrl-X, then Enter to save and exit the editor:
/swapfile none swap sw 0 0
Also, to let the system only use the swapfile if really necessary, open the following file in nano by performing:
sudo nano /etc/sysctl.conf
In the end of the file, add the following line:
vm.swappiness=1
ALLOWING SSH ACCESS FROM ANOTHER COMPUTER ON THE NETWORK
We want to make the setup headless. This means that there are no monitors, keyboards, mice, etc. plugged into the Pi when it's running. So if we want to log in to the Pi anyway, we will make an SSH connection to it from an ordinary computer and get access to the Pi's command line this way. To allow for this, we need to get the local IP address of the Pi. Maybe you can see it in your router's user interface—otherwise start the Terminal on the Pi and run ifconfig. With a cabled connection, your IP address is in the eth0 section, with a wi-fi connection, it is in the wlan0 section.

We'll also make sure that the SSH server on the Pi is installed and started at boot:
sudo apt install openssh-server
sudo systemctl enable ssh
Now you can power down the Pi (if you are in text mode by now, you can do so using the command "sudo halt"), and you may remove keyboard, mouse, and screen. The only cables you need from now is the power and Ethernet cables, and of course the PiDrive if you're using that. If you want to log in to the Pi through SSH from another computer on the network, you may do so with (change "192.168.1.199" into your Pi's IP address, and "pinode" into the username you created on the Pi):
This is assuming your other computer also runs some sort of Linux/Unix (maybe including MacOS?). If you're on Windows, you can use the PuTTY SSH client.
LETTING BITCOIN CORE START AUTOMATICALLY ON BOOT
Also, we want Bitcoin Core to start whenever the Raspberry Pi has been started up. And in addition to that, we will attempt to start it every five minutes in case it stopped for some reason. An easy way of doing that is through "crontab" which is a mechanism in any Unix/Linux system that can start programs and scripts at certain times and occasions. There may be other, more correct ways of doing this, but crontab seems to do the job. To edit the crontab settings, run:
crontab -e
If this was the first time you ran that command (it most likely was), you will be presented with a menu where you can choose a text editor to use. Again, if you have no other preferences, select "nano". Scroll all the way down in the file that nano opened for you, and add the following as the last two lines:
@reboot bitcoind -daemon
*/5 * * * * bitcoind -daemon
OPEN PORT IN YOUR ROUTER
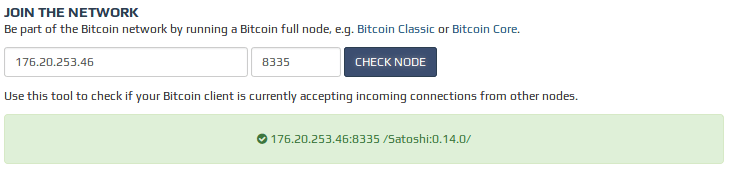
In addition to your node making connections to other nodes, you will want other nodes to also be able to connect to your node. This is done by forwarding incoming traffic on port 8333 to the Raspberry Pi. How to do this varies from network to network, but typically involves entering the web interface of your network router or modem, and setting up "Port Forwarding" there.
Typically this is done by simply adding the local IP address of the Raspberry Pi (which you found above, e.g. 192.168.1.199) along with port number 8333 to a list of forwarded ports. Refer to the documentation from your router/modem's manufacturer on how to do this exactly. Some routers even do this automatically so you don't need to do anything.
You can verify that it works by using Bitnodes' "Join the network" feature. If it returns a line that includes the word "Satoshi", you have successfully forwarded traffic on port 8333 to your Pi. Notice that while your Pi is still synchronising the blockchain, it might be lagging so much that Bitnodes will report it as unreachable. Try again after synchronising is done.
START YOUR NEW FULL NODE
Now it's time to plug your node in, and let it synchronise with the network. This will probably take several days. You can keep track of the progress by logging in (remotely or with a keyboard) and running the command:
bitcoin-cli getinfo
Compare "blocks" line with the most recent block number at your favourite block explorer (such as Blockchain.info).
Some have reported that their node stops synchronising at around block 300,000. If this is the case for you, you might want to replace your ~/.bitcoin directory with my (at the time of writing) fully synchronised directory, or even my complete SD card image file that you can download below.
DOWNLOAD AND USE MY ALMOST READY-TO-GO IMAGE INSTEAD
I've already done the work, so why should you? Well, because you might not trust me to not offer a malicious Bitcoin node that will break into your private network and steal all your Bitcoins and private data. And why should you; after all you don't know me.
Anyway, for the brave few, I've completed this guide for you, let the node synchronise with the Bitcoin network, and made an image file of my SD card available to download.
Download complete Pi 3 image
The image file is for a pruned node without any external drive (such as the PiDrive) attached, ready to be used on a Raspberry Pi 3 with an SD card of at least 16 GB:
Download my (almost) ready-to-go pruned Bitcoin node SD card image
SHA256: b9ce45dd2af0c3ab8d07ec31ea058bbaf92f641c679cc2225726113fffd5fd66
MD5: d3d33be1a85df13629c5d281bfc1c5b4
After transferring the image to your SD card, you are urged to log in (username pinode and password pinode) and change the password (you will be asked to change it when logging in for the first time) and then run the system update commands below (this will also ensure that Bitcoin Core is updated, in case a new version has been released since this guide was written):
sudo apt update
sudo apt upgrade
You also still will need to open a port in your router as described above.
Download only the blockchain for your node
You might also want to set up the system yourself and only download my (at the time of writing) fully synchronised ~/.bitcoin directory to save on sync time (which can be long). Transfer the compressed file to your Pi through SCP (file transfer over SSH), copy the directory on to your SD card through your SD card reader on your normal computer, or download it directly from the Pi:
Download pruned ~/.bitcoin directory
SHA256: dd6ffcce71590f7a72356182ff80df00c11408a54b122305969fdb2df975fe63
MD5: c36816adf5ca4fb9ea515b871e318bfa
With the compressed file in your home directory (~) on your Pi, remove your old bitcoin directory (backup your bitcoin.conf file first if you made changes to it other than described in this guide) and extract the file to the right place (might take some time) with:
cd ~
rm -rf .bitcoin
tar -zxvf bitcoindirectoryfilename.tar.gz
THANKS!
If we're to conclude anything from this, it must be that while installing and setting up a Raspberry Pi 3 system to act as a Bitcoin node is a fairly smooth procedure, the relatively low spec'ed hardware makes it quite painful to actually synchronise with the blockchain. Possible yes, but still painful. Especially the last couple of hundred blocks seem to take forever and then some. When the node is synced up, though, it seems to run without any problems.
I hope you liked this guide as much as I liked writing it. If anything is unclear, or you have any tips to share, please feel free to do so in the comments below. Also feel free (but not obliged) to donate an amount of your choice.